
Personalized Shadow Box Step-by-Step Guide
8/2/20261 min read

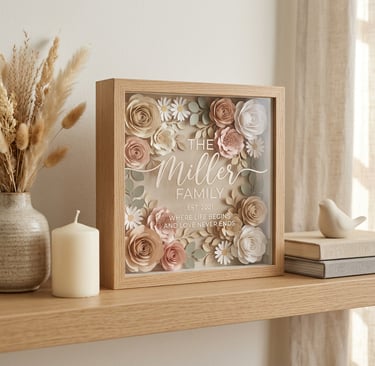
If you're looking for a meaningful keepsake or a thoughtful gift, a personalized shadow box is the perfect solution! These decorative pieces can be customized with names, meaningful quotes, important dates, paper flowers, and layered paper designs. Whether it’s a wedding, anniversary, birthday, baby shower, Mother's Day, Father's Day, or Christmas, a personalized shadow box makes a unique and heartfelt gift that will be cherished for years to come.
Supplies You'll Need
Permanant adhesive vinyl
Cutting machine (Cricut, Silhouette Cameo, Brother ScanNCut)
Step-by-Step Tutorial
Design Your Shadow Box: Start by creating your layered paper design. Think about what names, quotes, and decorative elements you'd like to include for your personalized shadow box.
Cut the Paper Layers: Load your cardstock onto the cutting mat. Use your cutting machine to carefully cut each layer according to your design.
Assemble the Paper Layers: Gently glue the paper layers together. Make sure to do this carefully to create depth and dimension in your design.
Cut the Vinyl: Once your paper layers are ready, prepare the vinyl cutouts for your personalized name or quote.
Weed the Vinyl: Take your weeding tools to remove any excess vinyl from your design, ensuring you only keep the necessary pieces.
Place Everything Inside the Frame: Neatly arrange your paper artwork inside the deep photo frame before closing it up.
Apply the Vinyl: Use transfer tape to apply the personalized name or quote onto the glass or the inner layer of the shadow box.
Display Your Shadow Box: Finally, showcase your creation on a shelf or hang it on the wall. This beautiful personalized decoration is sure to impress!
Tips for the Best Results
Choose complementary colors for each paper layer.
Take your time when assembling the layers.
Clean the glass before applying the vinyl for a polished finish.
Choose elegant fonts for names and quotes to enhance your design.
Don't be afraid to experiment with different colors, paper designs, and personalized details!
Made with Creativity
Boutique-grade handmade ideas, Cricut tutorials, and curated crafting guides.
Explore
Home
Blog
Cricut
DIY Projects
Tools
Say Hello
willar@madewithcreativity.com
Pinterest: @madewithcreativity
Affiliate Disclosure: We earn from qualifying purchases.
© 2026 Made with Creativity-Curated Cricut tutorials and Craft Inspiration
Boutique-grade handmade inspiration